阿牛的博客

轻松编码,快乐生活

0%

前言

在完成中文的提取和过滤之后,我们需要对中文节点进行转换、翻译、替换。

文案转换

文案转换通常有一下几个情况

普通文案

比如”保存成功”,直接替换成对应的code即可

拼接的文案

"用户" + user.name + "不能为空",会做占位符转换, 将起变成"用户{0}不能为空", 然后替换成对应的code

注解中的文案

比如"用户不能为空",需要替换成成对应的{code},code两边需要加入{},以符合要求。

节点替换

普通文案

"保存成功"
替换为
I18nUtils.getMessage("save_succeeded")

拼接文案

"用户名" + user.name + "不能为空"
替换为
I18nUtils.getMessage("user_name_not_empty")

注解中的文案

@NotNull(message = "'type'不能为空")
替换为
@NotNull(message = "{type_cannot_be_empty}")

字段中的字符串

private static String abc = "你好"
替换为

1
2
3
private String getAbc(){
return I18nUtils.getMessage("hello")
}

MessageFormat.format中的文案

MessageFormat.format("用户名{0}不能为空", user.name)
替换为
I18nUtils.getMessage("user_name_not_empty", new Object[]{ user.name })

替换原理

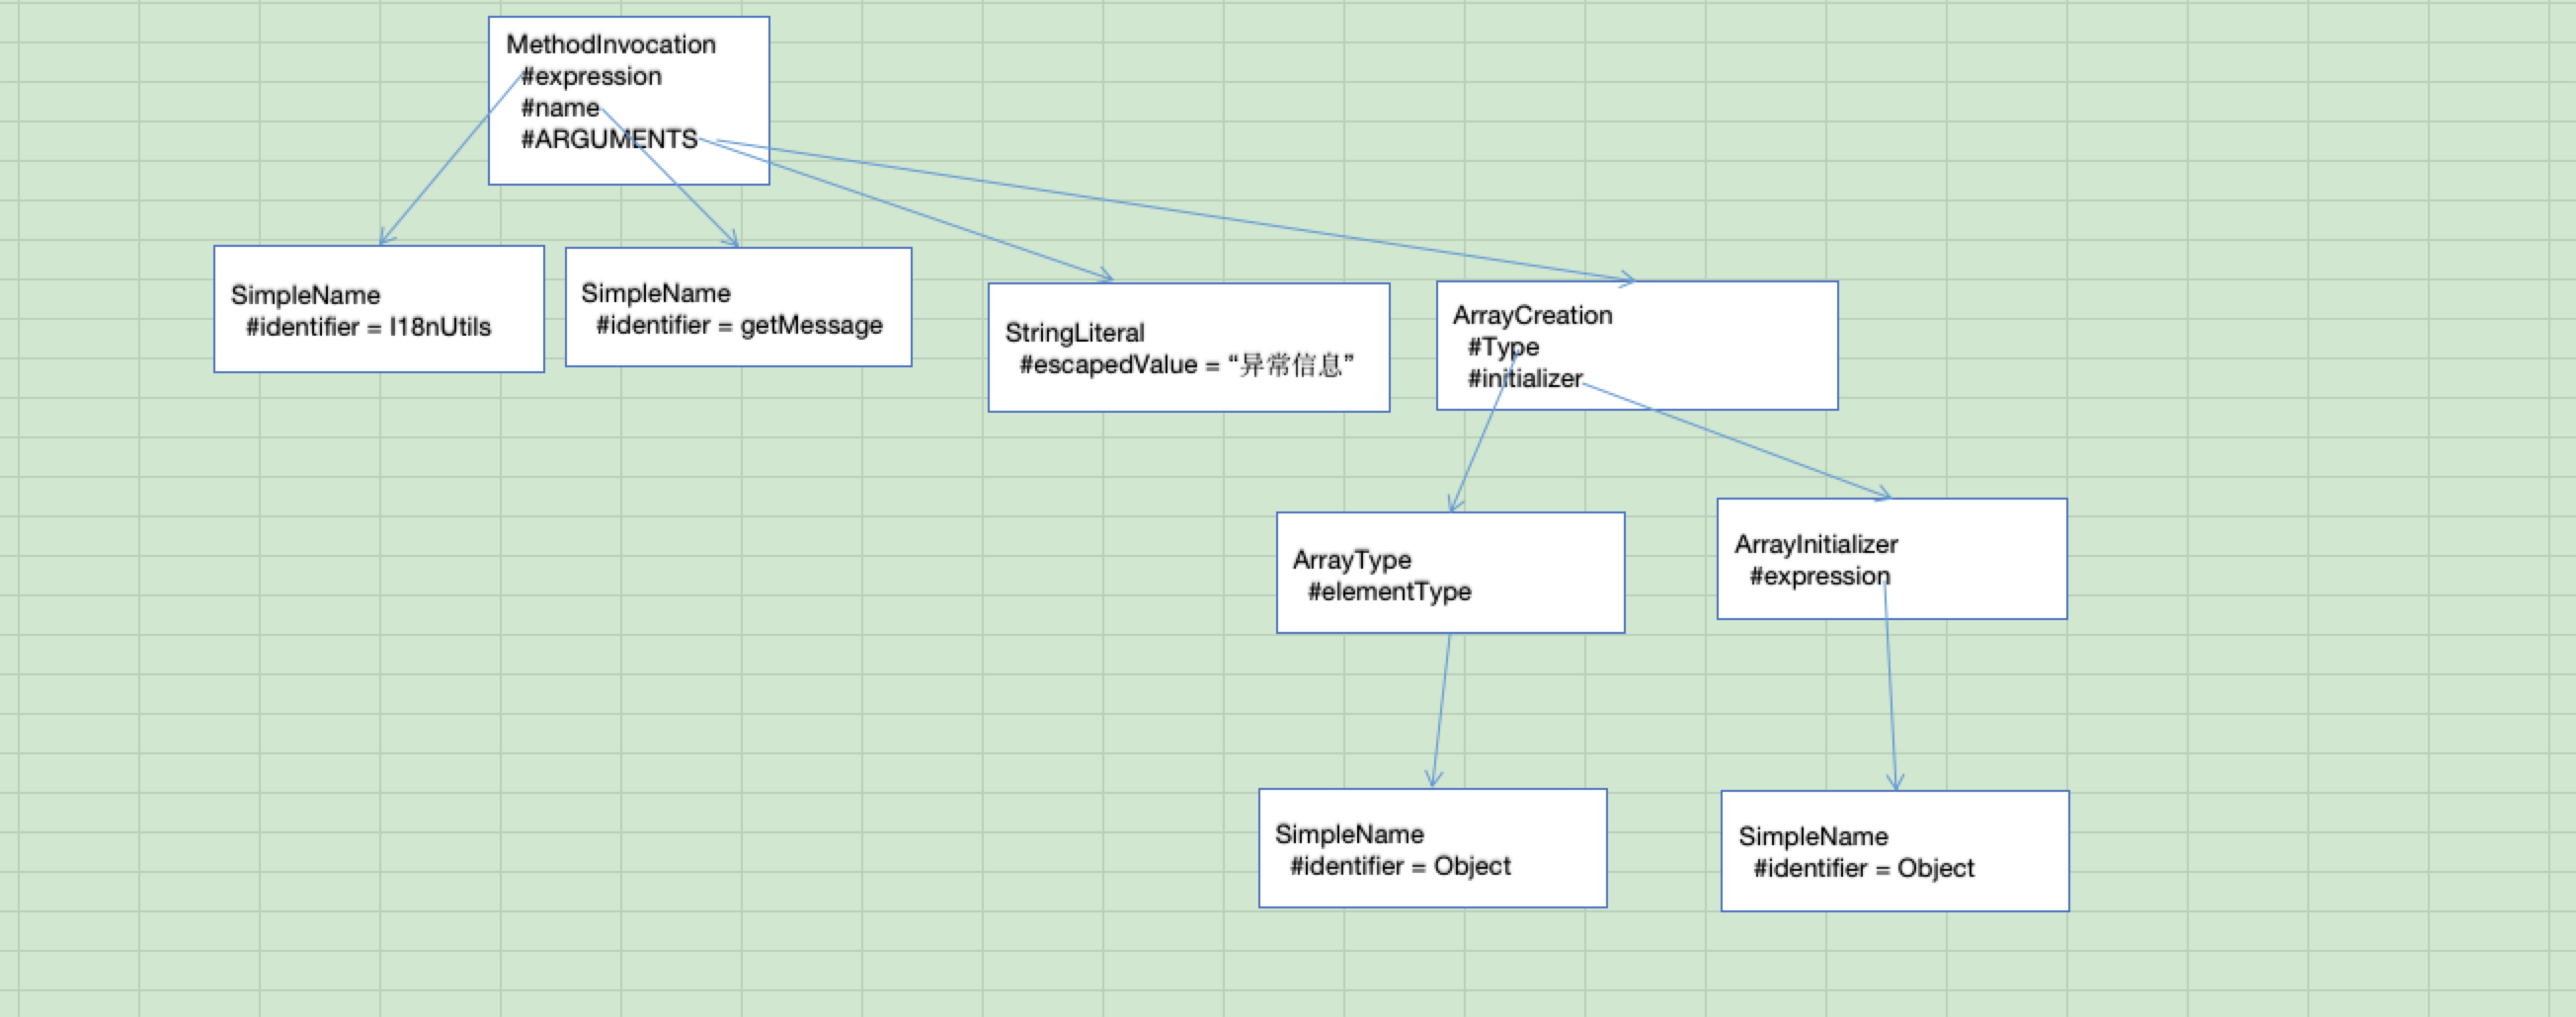
所谓替换,就是解析相应的AST树并转为目标树

普通文案AST树构造

1
2
3
4
5
6
7
MethodInvocation getI18nCall(List<ASTNode> args){
def methodInvocation = ast.newMethodInvocation()
methodInvocation.setExpression(ast.newSimpleName(Config.getI18nClass()))
methodInvocation.name = ast.newSimpleName("getMessage")
methodInvocation.arguments().addAll(args)
methodInvocation
}

复杂文案节点构造

源AST树(MessageFormat.format(“{0}”, row))

目标AST树(I18nUtils.getMessage(“{0}”, new Object[]{ row }))

1
2
3
4
5
6
7
8
9
10
11
12
13
14
15
16
17
18
19
20
21
22
23
24
void replaceMessageFormatWithI18n(MethodInvocation methodInvocation, StringLiteral stringLiteral){
def args = []
// 提取MessageFormat.format中的第一个中文
StringLiteral code = ASTNode.copySubtree(methodInvocation.getAST(), stringLiteral)
// 翻译并替换code
translateKey(code)

// 获取MessageFormat.format剩余的参数
List<ASTNode> retainExp = methodInvocation.arguments().subList(1, methodInvocation.arguments().size())
.collect({ ASTNode.copySubtree(methodInvocation.getAST(), (ASTNode)it) })

args.add(code)
def array = ast.newArrayCreation()
args.add(array)
// 构造new Object节点
array.setType(ast.newArrayType(ast.newSimpleType(ast.newSimpleName("Object"))))
def arrayInitializer = ast.newArrayInitializer()
// 将剩余的参数全部加入到new Object节点
arrayInitializer.expressions().addAll(retainExp)
array.setInitializer(arrayInitializer)

// 转换为I18nUtils.getMessage形式
convertStringLiteral(args, methodInvocation)
}

提取中文

本工具使用org.eclipse.jdt.core将java代码转换成AST

  1. 将java代码转换成AST树

    1
    2
    3
    4
    def parser = new Parser()
    CompilationUnit result = parser.ast(content)
    Document document = new Document(src.text)
    def ast = result.getAST()
  2. 使用Vistior模式遍历所有字符串

    1
    2
    3
    4
    5
    6
    7
    8
    9
    10
    11
    12
    13
    List<StringLiteral> visitChineseText(CompilationUnit result){
    var translateList = []
    result.accept(new ASTVisitor(){
    @Override
    boolean visit(StringLiteral node) {
    if(node.toString() =~ Config.DOUBLE_BYTE_REGEX){
    translateList.add(node)
    }
    return super.visit(node)
    }
    })
    return translateList
    }

过滤

原理:熟悉AST

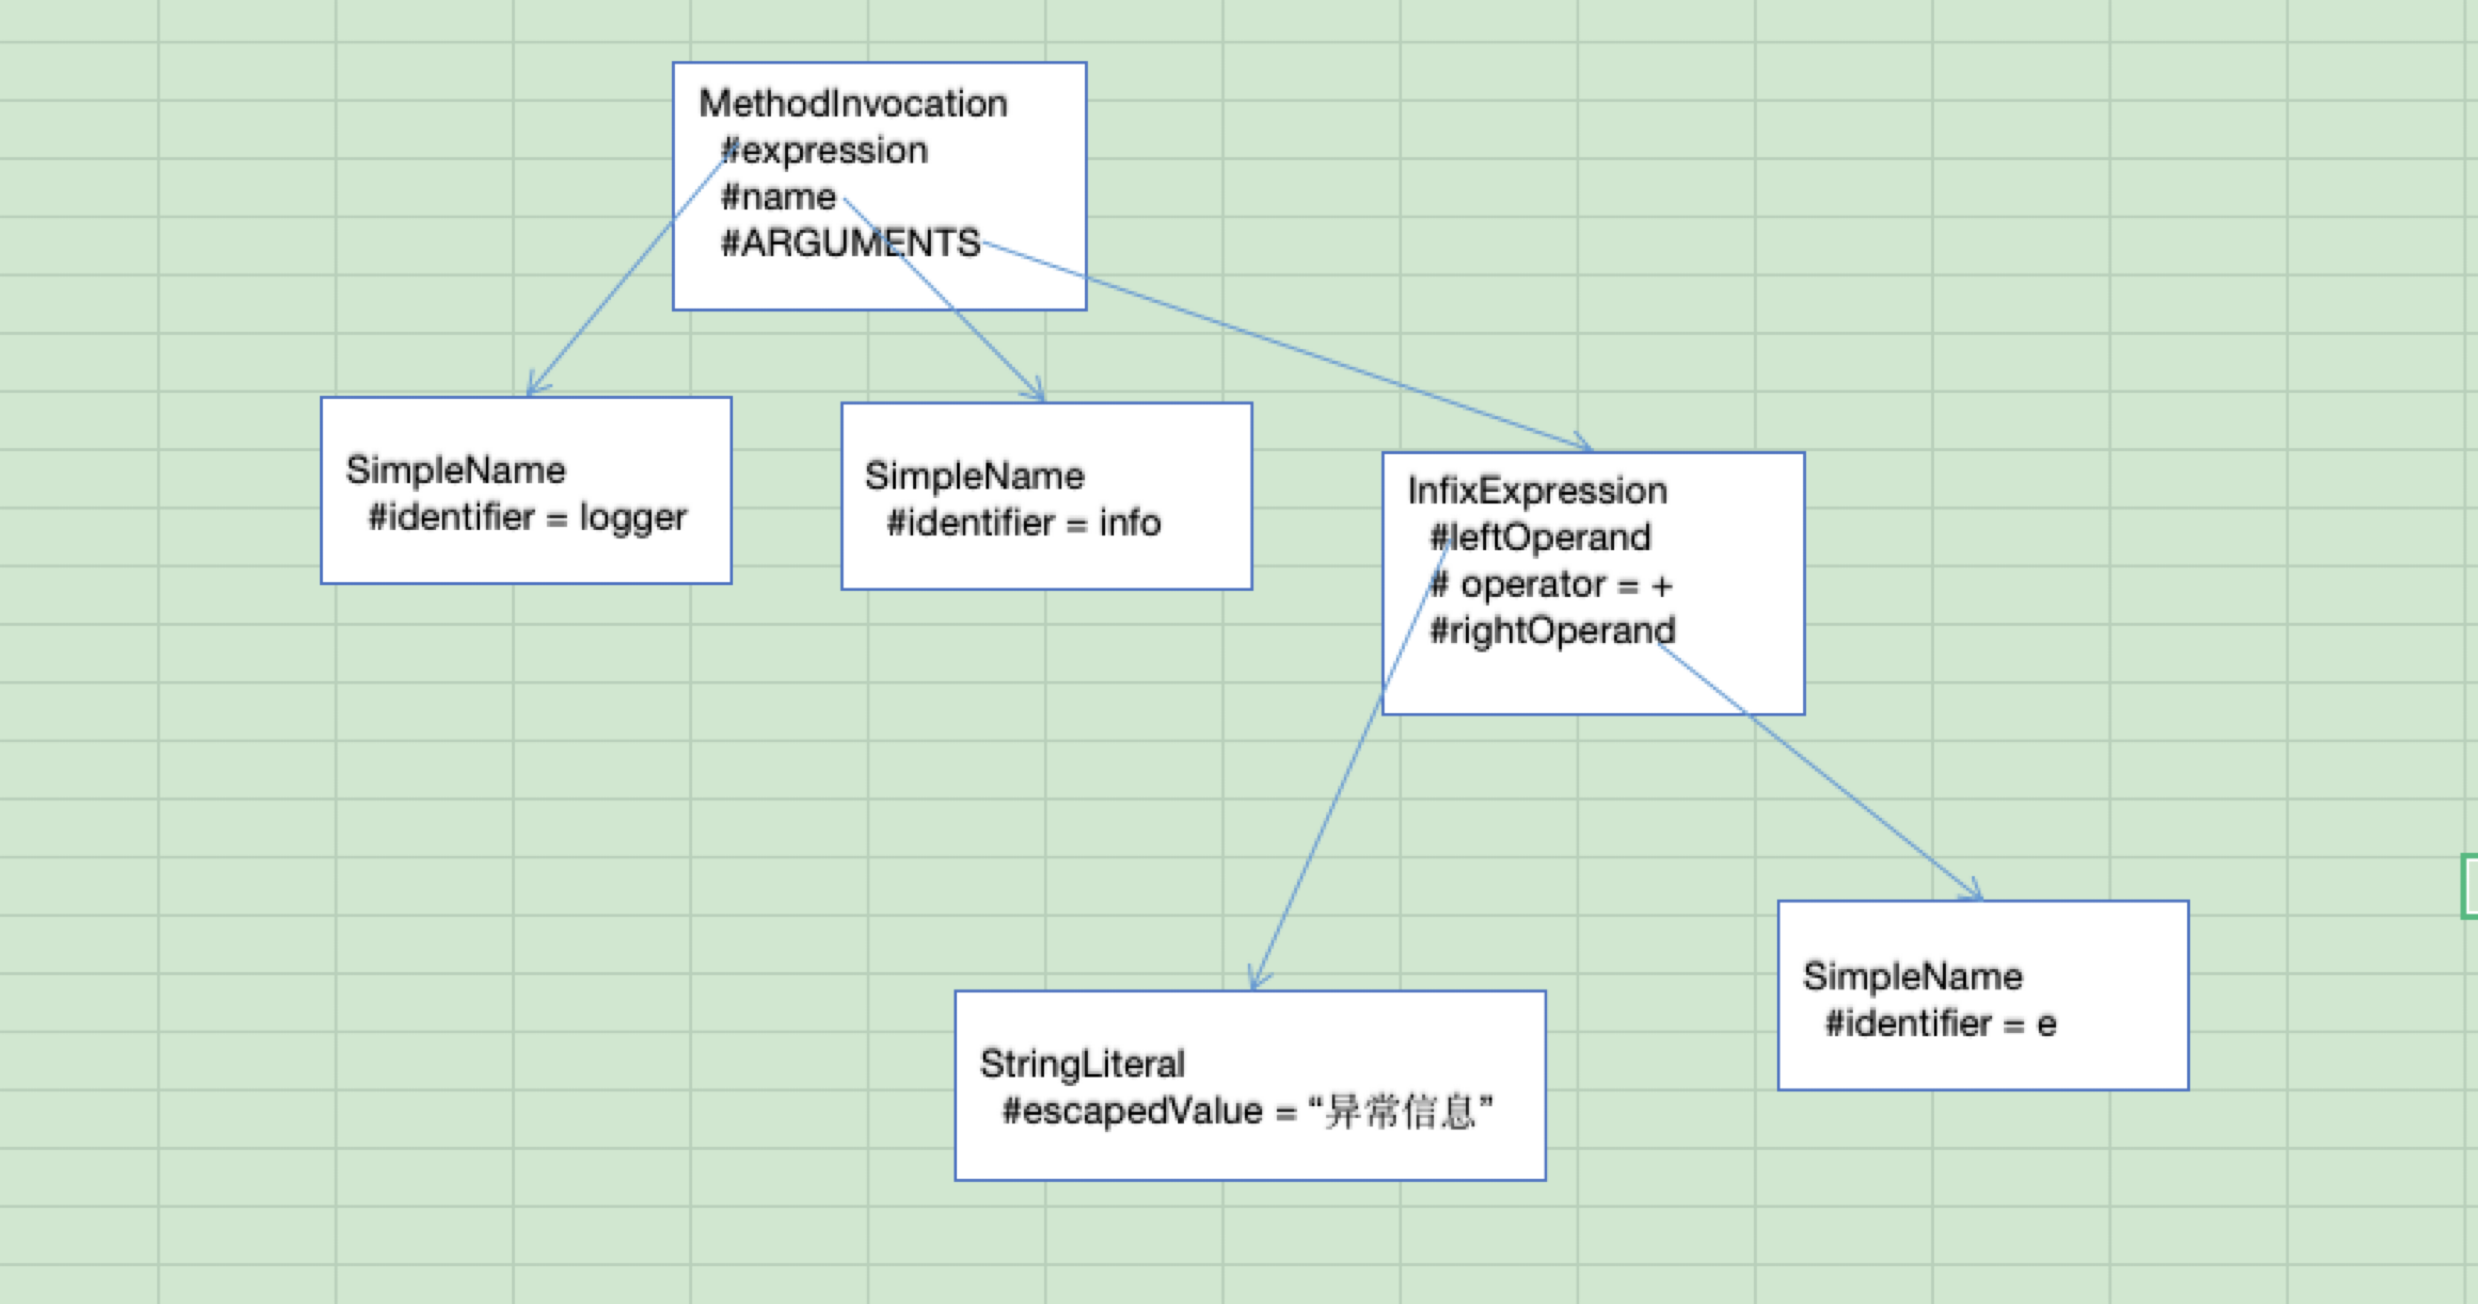
以下是logger.info("异常信息"+e)的AST

logger.info("异常信息"+e)

如果我们需要过滤logger.info("异常信息"+e),我们需要lookup到MethodInvocation节点,然后查看MethodInvocation的expression是否为SimpleName类型,且getIdentifier() == “logger”

需要过滤的中文

kiwi中实现的过滤器支持过滤以下中文:

  • 去除注释
  • 过滤log中的中文
  • 系统配置的中文
  • 参与业务逻辑的中文比如 “中文”.equsals(“中文”)
  • 正则匹配的中文字符(只包含标点)
  • 存在于注解中的中文
  • 存在于枚举的中文
  • 注释中添加了kiwi-disable-method

过滤器实现

所有的过滤器实现了Predicate<StringLiteral>接口,用来判断中文是否过滤

常用的过滤器有:

  1. 注解过滤器
1
2
3
4
5
6
7
8
9
10
11
12
13
14
15
boolean isInAnnotation(StringLiteral stringLiteral){
def parent = stringLiteral.parent
// 以StringLiteral节点向上查找,如果找到了注解,则返回true
while (parent != null && !(parent instanceof TypeDeclaration)) {
if(parent instanceof Annotation){
def memberValuePair = AstUtils.lookupUntilASTNode(stringLiteral, MemberValuePair.class)
if(memberValuePair.isPresent()){
return !shouldExclude(memberValuePair.get(), parent)
}
return true
}
parent = parent.parent
}
return false
}
  1. 常量过滤器
  2. 枚举过滤器

通常Enum里的中文无需翻译,也无法替换,因为不能在初始化的时候调用方法

1
2
3
4
5
6
7
8
9
10
11
public enum RpFlagEnum {
/**
* 应付
*/
P("P","应付"),

/**
* 应收
*/
R("R","应收");
}
1
2
3
4
5
def optMethod = AstUtils.lookupUntilASTNode(stringLiteral, EnumConstantDeclaration.class)
if (optMethod.isPresent()) {
return true
}
return false
  1. 日志过滤

过滤 log.info(“中文”)

1
2
3
4
5
6
7
8
9
10
11
12
13
14
15
16
17
18
19
def optMethod = AstUtils.lookupUntilASTNode(stringLiteral, MethodInvocation.class)
if(optMethod.isPresent()){
def methodName = optMethod.get().getExpression()
// log.info(xxx)
if(methodName instanceof SimpleName){
def simpleName = (SimpleName)methodName
if(isLogInfo(simpleName.getIdentifier())){
return true
}
// this.log.info(xxx)
} else if(methodName instanceof FieldAccess){
def fieldAccess = (FieldAccess)methodName
def fieldName = fieldAccess.getName()
if(isLogInfo(fieldName.getIdentifier())){
return true
}
}
}
return false
  1. Main方法过滤
  2. I18n方法过滤
  3. 注释中添加了kiwi-disable-method

某些情况下我们需要过滤的中文属于业务逻辑,但是代码无法判断,需要添加注释跳过

1
2
3
4
5
6
7
/**
*
* kiwi-disable-method
*/
pubic String abc(){
return "中文";
}
1
2
3
4
5
6
7
8
9
10
11
boolean hasMethodComment(StringLiteral stringLiteral) {
def parent = stringLiteral.parent
while (parent != null && !(parent instanceof TypeDeclaration)) {
if(parent instanceof MethodDeclaration){
def doc = parent.getJavadoc()
return doc.toString().contains(methodComment)
}
parent = parent.parent
}
return false
}
  1. 正则过滤器(正则匹配的中文字符(只包含标点))
  2. 参与业务逻辑的中文比如 “中文”.equsals(“中文”)
1
2
3
4
5
6
7
8
9
10
boolean hasStringEquals(StringLiteral stringLiteral){
def optMethod = AstUtils.lookupUntilASTNode(stringLiteral, MethodInvocation.class)
if(optMethod.isPresent()){
def method = optMethod.get()
if(method.name.identifier == "equals"){
return true
}
}
return false
}

国际化的困难在哪里?

通常项目中的异常消息等一系列文案都是中文,开发人员在开发的时候并没有考虑到国际化的情况,我们需要判断出哪些中文是注释,哪些中文是文案,哪些文案参与了业务逻辑。

kiwi-java

kiwi-java参照kiwi的国际化java代码的一个解决方案。本方案使用抽象语法树完美解决了上述问题。

流程图

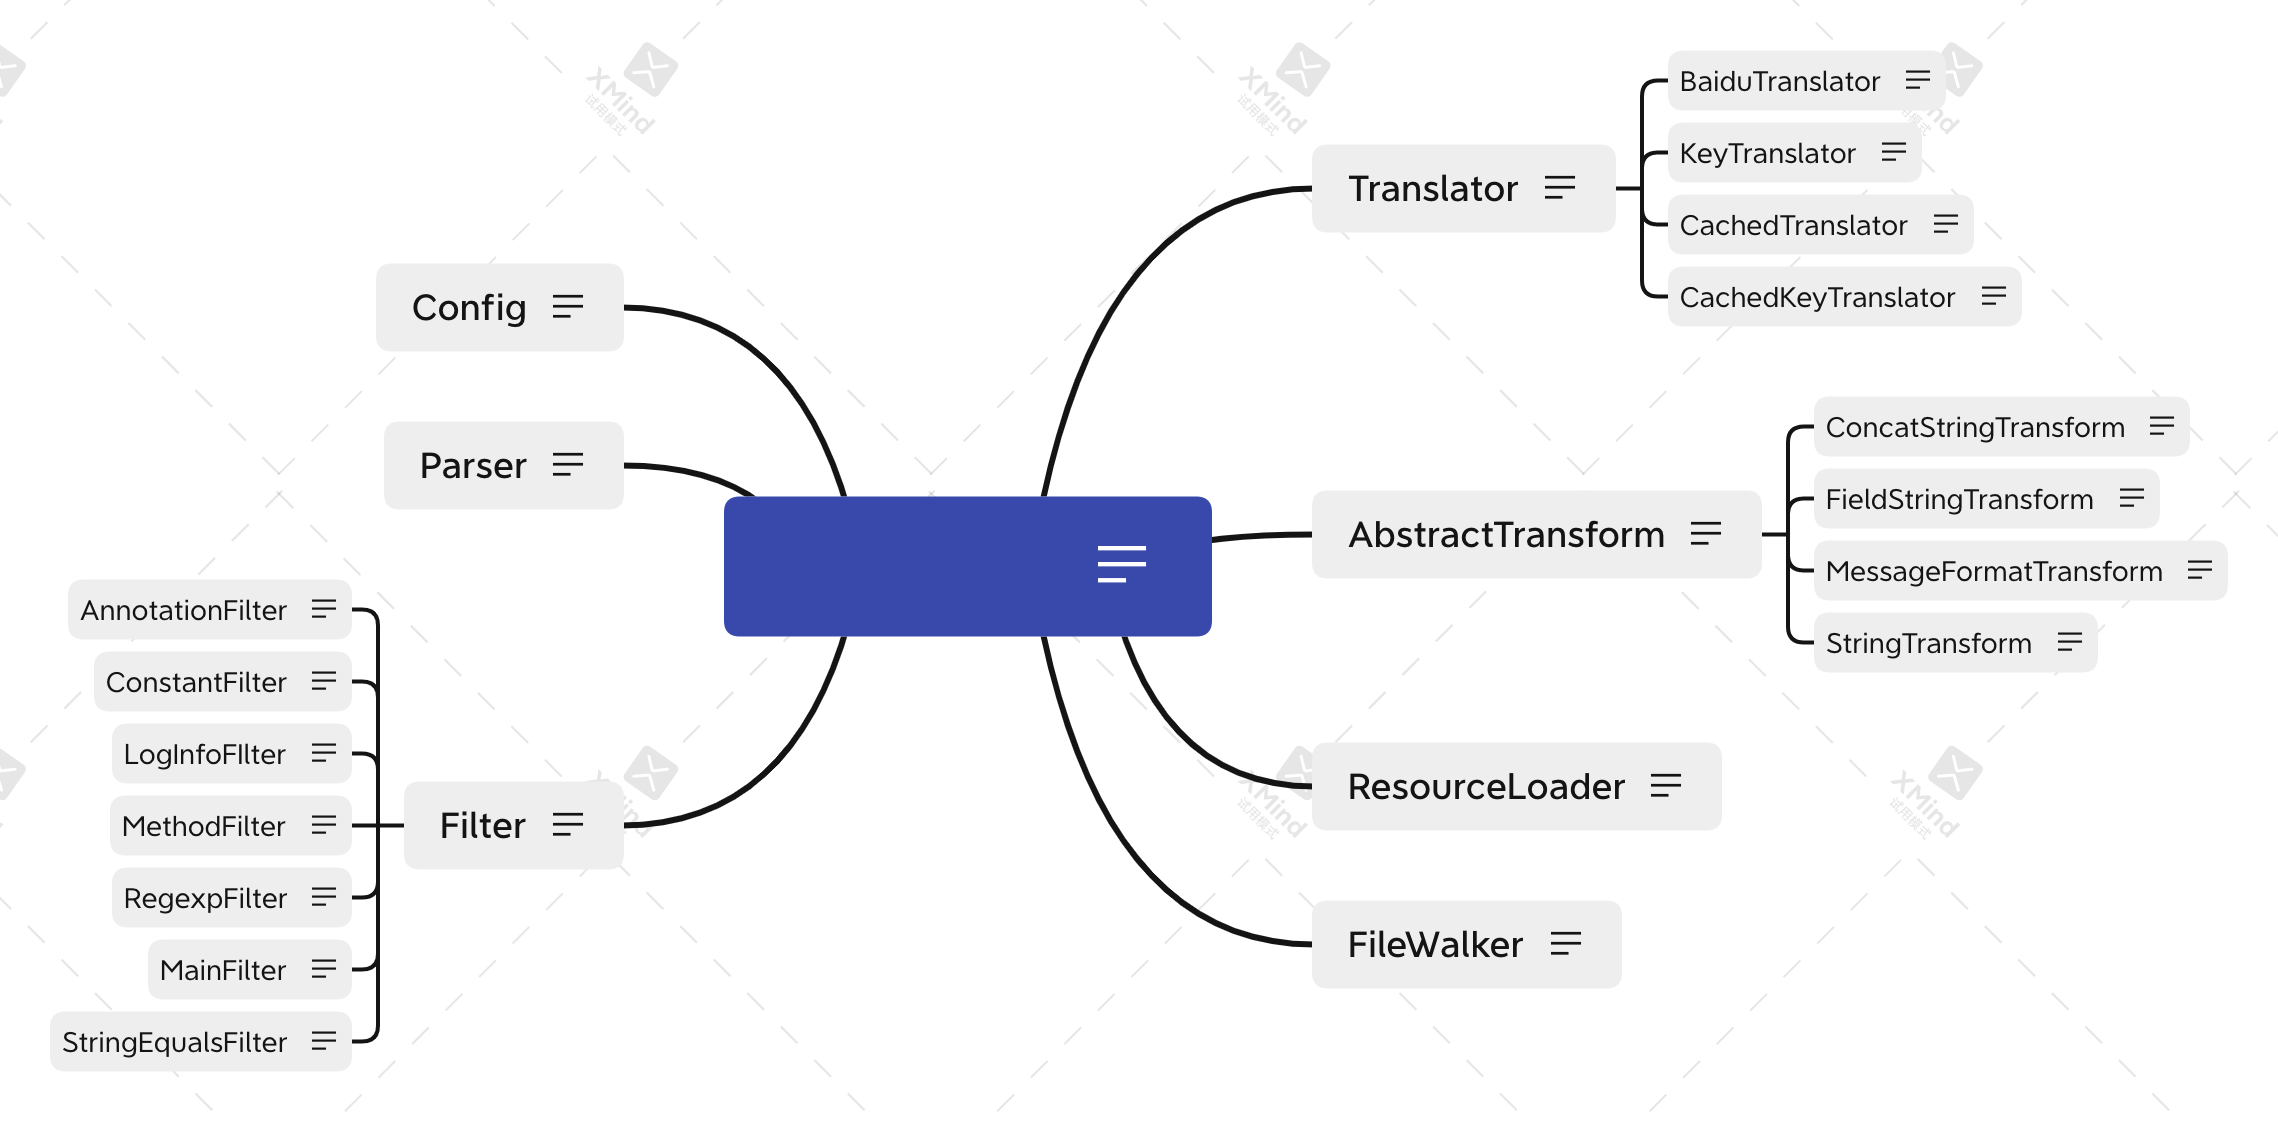
架构设计

kiwi-java主要包含四个核心模块:提取、过滤器、转换、翻译。

前言

在介绍 GraphQL 之前,先讲一个故事:

前端同学: 你给我返回的接口里面客户列表全是 ID,能不能返回详细信息
后端同学: 你自己根据 ID 去调用客户详情接口好了
前端同学: 目前接口能带上客户详情吗
后端同学: 不能
后端同学: (卒)

实际开发中我们常常遇到这种情况,前后端常常因为接口字段,类型等等问题进行友好的交流。前端总是想一次性拿到所有的数据,避免多次请求,尤其是带有先后顺序的请求;后端不想跨不同数据源获取数据,希望保持每个数据源为独立的接口便于维护。

而 GraphQL 的出现就是为了解决以上问题。

什么是 GraphQL

GraphQL 既是一种用于 API 的查询语言也是一个满足你数据查询的运行时。 GraphQL 对你的 API 中的数据提供了一套易于理解的完整描述,使得客户端能够准确地获得它需要的数据,而且没有任何冗余,也让 API 更容易地随着时间推移而演进,还能用于构建强大的开发者工具。

它具有以下优点:

  1. 在前端准确描述想要的数据,不多也不少
  2. 获取多个资源只用一个请求,GraphQL 查询不仅能够获得资源的属性,还能沿着资源间引用进一步查询
  3. 类型系统保证了数据正确

现阶段的困难

虽然 GraphQL对于前端有很多价值,但是提供 GraphQL API 的工作量却在后端。

如何解决?

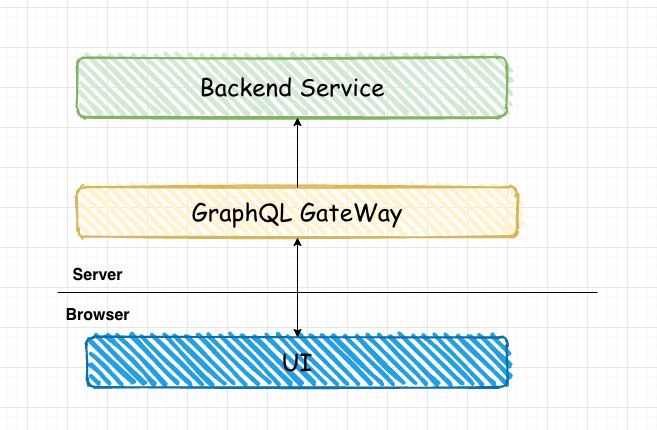
实际上,GraphQL 并不限制你运行的地方,我们完全可以把 GraphQL 网关层放在浏览器中。这样我们不需要后端配合,也可以等成熟后快速转换为后端服务。
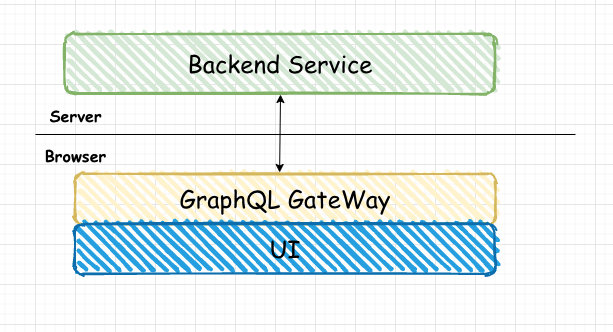
client-first-graphql

实战

GraphQL网关

假设我们有两个接口,分别为获取订单列表接口和获取客户详情接口。
现在我们把它们转换为GraphQL。

首先我们需要定义GraphQL类型

1
2
3
4
5
6
7
8
9
10
11
12
13
14
15
16
17
18
19
# schema.graphqls
# get /orders 返回 [Order]
type Order {
id: Int
# 客户ID
customerId: Int
}

# get /customers/{id} 返回 Customer
type Customer {
id: Int
name: String
code: String
}

type Query {
order(page: Int, pageSize: Int): [Order]
customer(id: Int): Customer
}

然后我们定义GraphQL的schema

1
2
3
4
5
6
7
8
9
10
11
12
13
14
15
16
17
18
19
20
21
// schema.ts
import { makeExecutableSchema } from "@graphql-tools/schema";
import typeDefs from './schema.graphqls'

const resolvers = {
Query: {
async order(obj: any, args: any, ctx: any, info: any) {
const res = await fetch(`/orders?page=${args.page}&pageSize=${args.pageSize}`).then(res => res.json);
return res;
},
async customer(obj: any, args: any, ctx: any, info: any) {
const res = await fetch(`/customer/${args.id}`).then(res => res.json);
return res;
},
}
};

export default makeExecutableSchema({
typeDefs: typeDefs,
resolvers,
});

对这一步,和在nodejs上建立GraphQL的schema一模一样。然后我们需要将schema暴露出去。然后我们需要将schema暴露出去。

  • 在nodejs中,我们可以通过http暴露:
1
2
3
4
5
6
7
8
9
10
11
12
13
14
15
16
17
18
19
20
21
22
23
24
25
26
27
// server.js
var express = require('express');
var { graphqlHTTP } = require('express-graphql');
var { buildSchema } = require('graphql');

// 使用 GraphQL Schema Language 创建一个 schema
var schema = buildSchema(`
type Query {
hello: String
}
`);

// root 提供所有 API 入口端点相应的解析器函数
var root = {
hello: () => {
return 'Hello world!';
},
};

var app = express();
app.use('/graphql', graphqlHTTP({
schema: schema,
rootValue: root,
graphiql: true,
}));
app.listen(4000);
console.log('Running a GraphQL API server at http://localhost:4000/graphql');
  • 在浏览器中,我们通过接口来暴露
1
2
3
4
5
6
7
8
9
10
// graphqlClient.ts
import schema from "./schema";
import { graphql } from "graphql";

export const graphqlClient = {
async query(source: string) {
const result = await graphql({ schema, source });
return result;
},
};
1
2
3
4
5
6
7
8
// 查询订单
graphqlClient.query(
`query getOrder{
order(page: 1, pageSize: 20) {
id,
customerId
}
}`)

扩展订单类型

我们知道GraphQL的优点之一就是将多个请求合并成一个请求,并且可以通过资源的字段属性进一步查询。
我们将在Order上添加Customer类型,以获取订单对应的客户名称。

1
2
3
4
5
# schema.graphqls
...
extend type Order {
customer: Customer
}
1
2
3
4
5
6
7
8
9
10
11
12
// schema.ts
const resolvers = {
Query: {
...
Order: {
async customer: (order: any) {
const res = await fetch(`/customer/${order.customerId}`).then(res => res.json);
return res;
}
}
}
};
1
2
3
4
5
6
7
8
9
10
11
12
13
// 查询订单
graphqlClient.query(
`query getOrder{
order(page: 1, pageSize: 20) {
id,
customerId,
customer {
id
name
}
}
}`)

n+1问题

当我们执行一次订单查询的时候,会返回20个order,然后我们需要在调用20次客户查询接口,总计调用了 20+1次。
我们知道GraphqlQL会沿着链路依次查询,order->customer->xxx,如果链路很长,会导致GraphQL响应变慢。

目前GraphQL通用的解决方案是Facebook提供的Dataloader, 他的核心思想是Batch Query和Cached。
假设我们有一个接口,可以通过id列表查询所有的客户/customers?id=123,456,789

1
2
3
4
5
6
7
8
9
10
11
12
13
14
15
16
17
18
19
20
21
22
23
24
25
26
27
// schema.ts
import DataLoader from "dataloader";
import keyBy from "lodash/fp/keyBy"

async function batchGetCustomers(keys: string[]) {
const result = await fetch("/customers?id=" + keys.join(",")).then(res => res.json());
// 将数组转换成字典
// [{ id: 1, name: "foo" }, { id: 2, name: "bar" }]
// => { "1": { id: 1, name: "foo" }, "2": { id: 2, name: "bar" } }
const resultMap = keyBy("id", result);
// key和对象需要一一对应,如果为空返回null
return keys.map((x) => resultMap[x] || null);
}

const customerLoader = new DataLoader(batchGetCustomers);


const resolvers = {
Query: {
...
Order: {
async customer: (order: any) {
return customerLoader.load(order.customerId)
}
}
}
};

最终我们把查询从20+1次降低到1+1次

总结

虽然我们解决了复杂数据的组织问题,但是难以避免会产生各种性能问题。在以后的计划里,我们将更进一步:

  1. 使用独立后端提供GraphQL网关服务
  2. 使用持久层解决数据缓存问题
  3. 使用低代码实现任意数据的组织

使用函数式编程实现接口缓存

假设我们需要请求一个接口

1
2
3
4
5
6
7
8
9
10
11
12
13
const get = (url, params) => Promise.resolve(params);

const getData = (params) => get("/api", params);

const appendDiv = (text) => {
const div = document.createElement("div");
div.innerText = text;
document.body.appendChild(div);
};

getData({ q: 123 }).then((data) => {
appendDiv(JSON.stringify(data));
});

使用缓存优化性能

现在为了性能优化,我们需要对性能优化需要做缓存处理

1
2
3
4
5
6
7
8
9
10
11
12
13
14
15
16
17
18
19
20
21
22
23
// ...

const cacheMap = {};

const getKey = (url, params) =>
JSON.stringify({
__url: url,
...params,
});

const params = { q: 123 };
const key = getKey("/api", params);

const handleData = (data) => appendDiv(JSON.stringify(data));

if (cacheMap[key]) {
handleData(cacheMap[key]);
} else {
getData(params).then((data) => {
cacheMap[key] = data;
handleData(data);
});
}

利用代理模式分离缓存和业务逻辑

我们可以利用代理模式的思路,将缓存和请求分离开来

1
2
3
4
5
6
7
8
9
10
11
12
13
14
15
const getDataProxy = async (params) => {
const key = getKey("/api", params);
if (cacheMap[key]) {
return cacheMap[key];
}
return getData(params);
};

const handleDataProxy = (params, data) => {
const key = getKey("/api", params);
cacheMap[key] = data;
handleData(data);
};

getDataProxy(params).then((data) => handleDataProxy(params, data));

使用 currying 和高阶函数复用代码

虽然我们现在把当前请求的缓存和请求分离开来,但是只限定当前请求,并不能通用化
我们使用高阶函数来实现代码复用

1
2
3
4
5
6
7
8
9
10
11
12
13
14
15
16
17
18
19
20
21
22
23
24
25
26
import { compose, tap, curry } from "lodash/fp";

//...
const ifElse = (flag, firstFun, secondFun) => {
return flag ? firstFun : secondFun;
};

const getCache = (key) => cacheMap[key];

const setCache = curry((key, data) => (cacheMap[key] = data));

const proxyRequest = curry((url, request, params) => {
const key = getKey(url, params);
return ifElse(getCache(key), () => getCache(key), request)(params);
});

const proxyHandleData = curry((url, handleData, params, data) => {
const key = getKey(url, params);
setCache(key, data);
handleData(data);
});

const getDataProxy = proxyRequest("/api", getData);
const handleDataProxy = proxyHandleData("/api", handleData);

getDataProxy(params).then(handleDataProxy(params));